


Diablo_692
-
Posts
66 -
Joined
-
Last visited
Content Type
Profiles
Forums
Gallery
Blogs
Posts posted by Diablo_692
-
-
June......
Wow did not know that..... I will have to check this out
Thank You.....
Bxtech.
Did you get this to work, i.e. any movement up or down on the instrument panel while holding the button up? To be honest I've never really gotten it to work or provide any real adjustment on my '93.
-
Very exciting. I too am keenly interested as a Lambo NA rep told me it would be coming awhile ago and also said that the Diablo would be included, but I'll wait to see that in writing. I'm more curious how they plan to handle previously outsourced parts such as a Lucas turn signal switch assembly or the Diablo's ECUs -- admittedly not as simple to recreate as a shifter knob.
Good point regarding the Diablo ECU's, as some of those electrical components may no longer be available to enable the original supplier to make more ECU's. It will be interesting to see how the Factory handles that.
-
I wonder what the "newest" model is that is considered a classic Lamborghini car for this program - Countach, perhaps early Diablos?? Would be great to see a list of which models the factory currently considers the classics.
-
An inexpensive automotive stethoscope can be helpful when trying to identify noisy components, bearings, etc. If the noise/whine happens while you're standing by the engine compartment, touch the tip of the stethoscope to the housing of the suspect component and see if the noise gets louder while you're listening. Obviously don't touch the tip to anything moving, and don't get it caught in belts, etc. while trying to access the suspect component. Good luck.
-
The host (wireless router, cable modem, etc.) should be providing this stuff (DNS server values, IP address) to your client (laptop) automatically. Be sure that the wireless network that you're trying to access isn't MAC filtering to prevent unauthorized access. Did this laptop that you're having trouble with ever access this particular network successfully?
-
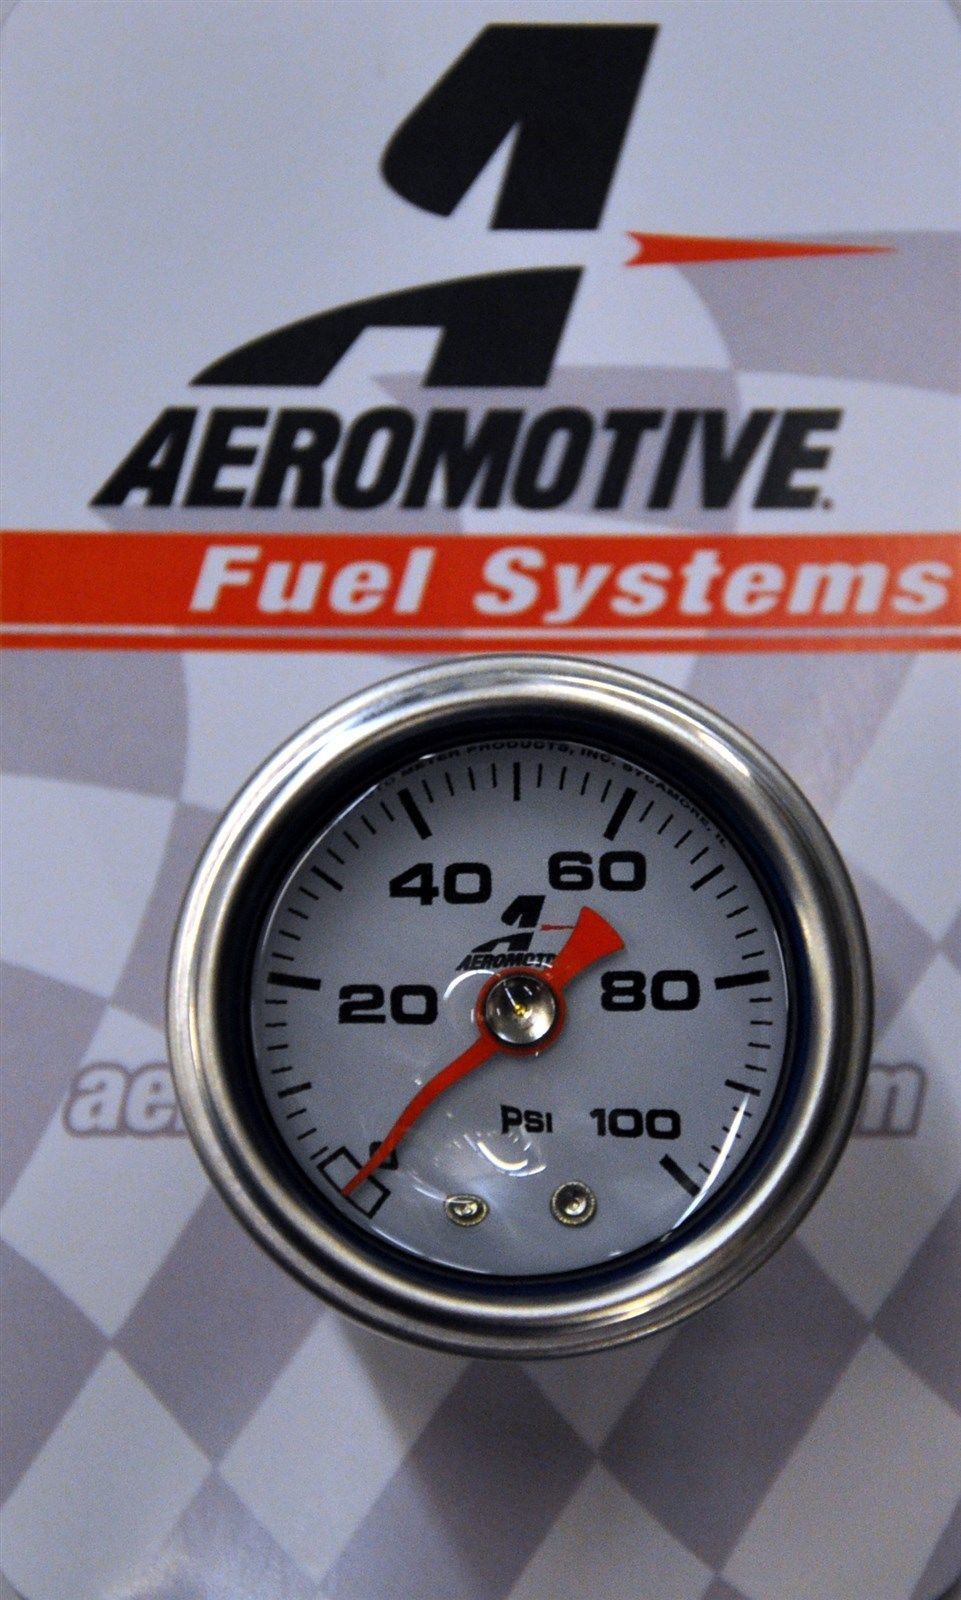
Look what just arrived:
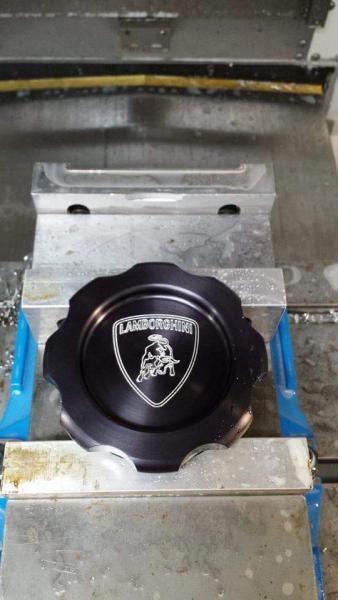
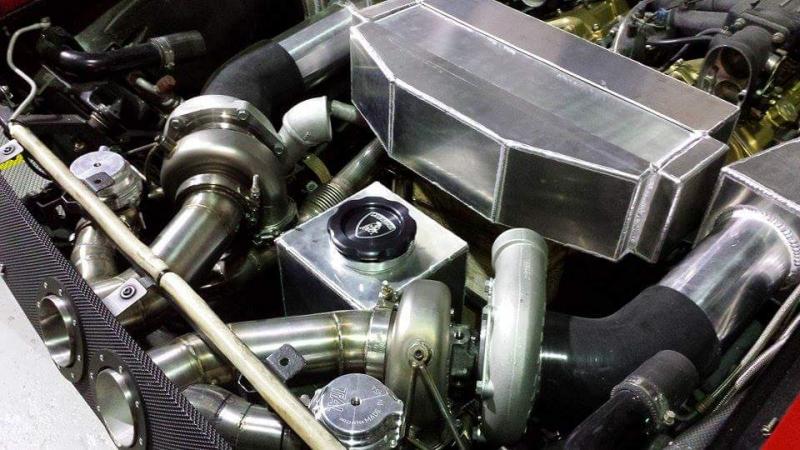
Ok, so I'm curious, what goes under that awesome looking cap?
-
By chance was that your red Countach sitting out front of Norwood today? If so, it was looking fine!
-
Looks great!
So are you pleased with how it looks and drives after the time spent at Norwood? Would you recommend them based on your recent experience?
-
Awesome, glad to hear it! Who are using to transport it, and did you pick the carrier or did Norwood arrange it?
-
No problem. Enjoy it, it's Spring Break!
-
Great! Glad you're back up and running again.
-
I'm not sure what your static pressure should be with the engine off and the key in the accessory on position. The ECU's should start the pumps momentarily to pressurize the fuel rail, which is likely the 20psi reading that you saw on the gauges. At this point, there will not be any vacuum on the FPR's because you don't have the engine running. The 20psi seems a little low to me since you said these new FPR's are 30 to 70 psi, but perhaps the pumps weren't on long enough.
To truly adjust the FPR's, the pumps will need to be running (like it states in steps 3 & 4 of the fuel pump delivery check) and you'll need a handheld vacuum pump to check the fuel pressures at the different vacuum levels that you apply with the vacuum pump. Doing the "bar to psi" conversions, from the table it looks like from ~26psi @ 600mm/Hg and ~33psi @ 200mm/Hg are the range of pressures you're after.
I'm kind of surprised that your pressures went back to 0 so quickly. The manual seems to imply that 1 bar (14.5psi) of pressure should remain on the system for about an hour.
-
Here's the relevant page from my '91-'93 service manual. It may be of use to you regarding the system fuel pressures at the various vacuum settings.
-
Looks good. Can't tell from your pictures, but were you able to use the existing mounting brackets (the twisted pieces of flat steel) for your new regulators or did you have to make something new?
-
Think about it this way, if you sell the 25th or the GT you will NEVER see them ever again, for any amount of money.
Unless you can honestly say you're tired of tripping over them and even just seeing them isn't worth the hassle, you can't sell them.
Agree with what emanon said; those are the keepers.
-
What is it that makes a girlfriend's butt get big? Wedding cake.
No, I'm not married.

-
NOTE: Proceed at your own risk. This is based on a 91 Diablo. I assume the same for 91-93, but may be the same for all 5.7 L. Check your own setup and ask questions if you have concerns before attempting this.
I saw this brand used on TopCarbon's old yellow Diablo. However, I will note some slight differences. Per the manual Fuel Pressure should be 2.5 bar or about 36 psi. The fuel pumps (and most fuel pumps) are 43.5 psi but difference flow rates and there is some loss through the system before the fuel rails. The stock 91 Diablo setup consists of two separate lines out of the fuel tank, each into pre filters, then fuel pumps, then post filters, then fuel rails before hitting the regulators. The regulators then have return lines which meet at a "T" fitting and then a SINGLE line runs back to the tank.
NOTE: this was the one difference on topcarbon's layout because each return had it's own line until somewhere close to the fuel tank. Not sure if this matters or was just a preference by his mechanic but I left the stock layout. Also, TC's mechanic chose a slightly different style FPR but to the best of my knowledge, they have the same psi range but are just different designs.
Parts List: (General note that there are some color options with different part numbers)

Aeromotive 13129 EFI Adjustable Fuel Pressure Bypass Regulator 30-70 PSI (Ebay $121 shipped each) - NEED 2
- NOTE: The fuel pressure regulator has 2 input ports, 1 return port, 1 gauge port, and 1 vacuum/breather port. This question was raised in old posts on whether one FPR could be utilized instead of 2. I can't see why that couldn't work, although you would not need plugs in that case but would either need 90 degree fittings or an assembly of fittings to meet the hoses to the fuel rails. Once you see pictures of the setup, you will understand why. BUT since no one confirmed that would work and this isn't incredibly expensive, I went ahead and went with the 2 FPR setup.
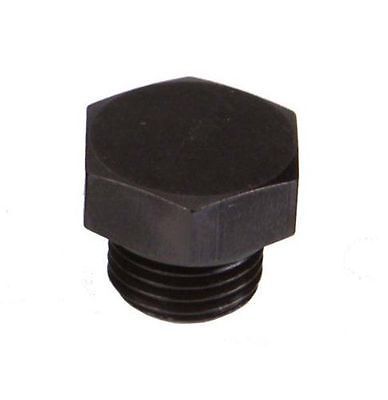
Aeromotive 15626 AN-06 Port Plug (Ebay $9.30 shipped each) - NEED 2

Aeromotive 15633 0-100 PSI Dry Fuel Pressure Gauge Chrome Bezel 1/8" NPT Male (Ebay $26 shipped each) - NEED 2
-NOTE: One of these came with fluid and one without. No idea which is better or if it matters. Part number was the same though...Also note that the FPRs come with a plug in the gauge port (see FPR picture) and you will need to remove these before installing the gauge.
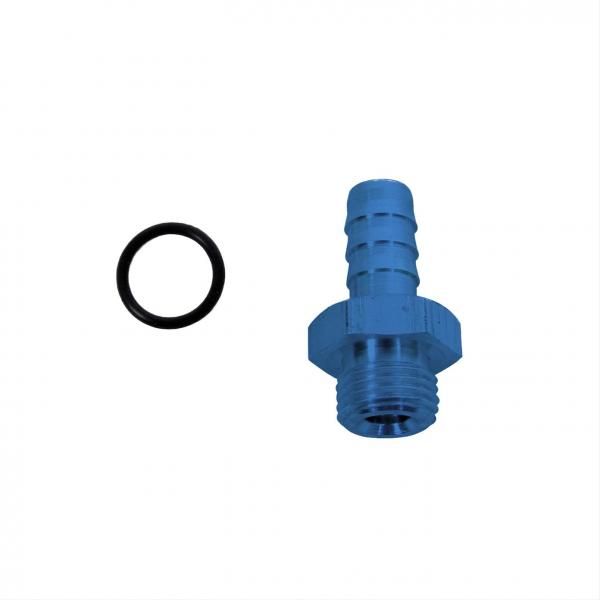
Summit Racing® Hose Fittings SUM-220168 (Summit Racing $5 each) - NEED 4
-NOTE: This is a An-06 to 3/8" barbed hose fitting. I was able to get these to fit but I think the inner hose diameter for the fuel hoses is actual 5/16", which I didn't see offered by somewhere but if you wanted to get some of those too and try to see which fits better.
Fuel Hose Clamps - I got some from my local PepBoys for about $3 per pack of 4. NEED 4 or 1 Pack
The Plugs are used to block off one of the unused input ports on each FPR. Plugs and fittings come with O-rings but do NOT need sealant. Gauges do need sealant...teflon or other appropriate sealant. Plugs and fittings can be tightened with a 19mm wrench.
BEFORE you remove the old FPRs, you need to get rid of the fuel pressure in the system. Easiest way is to turn the car on and then pull the couple fuses in the compartment behind storage behind the passenger seat. This stops power to the fuel pumps and relieves most of the pressure. PLEASE check your manual or ensure you are pulling the right fuses if this is not an early Diablo. Double and triple check.
REMOVE stock FPR:
Remove vacuum/breather hoses (tiny hoses). Place paper towels or rags under the hose ends to catch the fuel.I used some pliers to squish the clamps to loosen in order to pull the lines off the FPRs. May be a small puff with the remaining fuel pressure once the first hose comes off. Each FPR is held onto a metal bar by a small allen head screw so remove those in order to pull off the FPRs.
Slide NEW fuel hose clamps onto the hose end and then push the fittings into the hoses. Once they are in far enough, tighten down the new clamps. How you mount the FPRs is up to you. Ensure everything is tightened up. Then put the fuses back in and turn the key to the accessory on position (DO NOT START IT). This should allow fuel pressure to build and you can use the allen head to adjust the fuel pressure on each gauge to be ~36 psi. If pressure does not build, may need to turn key off and wait a minute and then turn key back to accessory on position. See instructions that come with FPRs.
Tomorrow I will add more pictures of my actual set up. Since I have an exhaust and intakes, I may set my FPRs at 37 psi.
Chipster,
The Aeromotive 15633 fuel pressure gauges that you have are supposed to be liquid filled. Perhaps the little vent on the top of the gauge opened and the liquid leaked out. I'm not sure how much needle fluctuation will occur on the Diablo when it's running, but the liquid is in the gauge to dampen that fluctuation and provide a steadier reading. The disadvantage of a liquid filled gauge over a dry gauge is the pressure reading on the liquid filled gauge will be affected by temperature in the engine compartment. That is why the manufacturer provides the external vent on top of the gauge. Once you have it mounted with the vent at the top (so the liquid doesn't leak out), lift up on the stem to equalize the pressure, then push it back down and take your readings. Keep us posted on how it goes.
-
I care more about how large my next turd will look after my coffee this morning than I do about what color this dress is.

-
Sooooooo....I replaced the 4 relays in the engine bay fuse/relay panel along with the 2 20 amp fuses for the electro injectors. Also the relay, 1 5 amp fuse and 3 10 amp fuses under the passenger rear seat area. And it cranked right up. Replaced them all at once so no idea which one was the culprit but i'm guessing one of the relays because all the fuses looked ok. So that's great news! I pulled the fuses back out from behind the passenger seat to kill the fuel pressure because i'm still going to install the aeromotive regulators soon.
Oddly enough, not sure what I wiggled and jiggled...I had also pulled off the panel to access the fuel pumps and check those out and wiggled some wires down there too....but when it cranked up was pretty much right at 12V on the battery gauge in the car which is pretty much the highest it's ever been lol. So turned into great news all around. I'll do a separate write up on the regulators install.
For the early Diablo, the Bosch 0 332 014 151 relay has been superseded by the Bosch 0 332 019 151 relay. The new ones are brown in color. And around $9 a piece. Paid $1 each for the fuses since they are the glow ones if they burn out.
Great news indeed, but c'mon man, one relay at a time
 so you (and we) know which was at fault!
Seriously though, glad it's running again for you.
-
Bavarian Auto. I think there were some cross referenced relay number options too but I went with the ones listed in the manual. Just normal fuses though...hopefully that's right. I'll see if they actually ship or if those relays aren't actually in stock. They were 9 something each for the Bosch relays.
Thanks, it's good to have a source should I need any of these parts in the future.
-
I'm definitely thinking fuel. But if it was a pump relay, wouldn't the car not start at all? I was thinking about replacing all the fuel system fuses and relays anyways. I'm guessing that relay may be a pain in the ass to get.
Edit: Found the relays...well assuming the website has them...but I ordered 4 to replace the ones in the engine bay fuse/relay box, along with the fuses for all the pumps and injectors. Also the ones behind the passenger seat.
If I may ask, what website are you using to source the relays & fuses?
Thanks.
-
Anyone seen this video yet? Pretty awesome and great sound. Vettel seems to approve!

-
Seems I remember reading, on older Diablos, that the alarm shuts down the fuel solenoid. And these get stuck. Some just remove.
Good luck
Thanks, perhaps in the mid to later '90s models, but I don't believe '91-'93 Diablos have this solenoid.
-
Chipster, the "od" of the OEM fuel hose between the rail and regulators on my '93 looks to be about 0.54 inches as measured with dial calipers. Can't give you a measurement of the "id" as the OEM hose clamps aren't a worm gear type and easily removable; they are double-eared, crimp on style and will have to be cut off. I would assume the id to be around 0.375 inches, as that's a standard size for fuel lines.
Ok, so curiosity got the better of me. I cut the hose clamp off at the regulator end and the "id" of the OEM fuel line hose is more like 5/16". A 3/8" "id" line would probably work and clamp down ok, but 5/16" will be more snug on the barb fitting of the regulator.


What Is This Switch Under The Dashboard??
in Archived Content
Posted
No, not really. Kind of why I was asking if you got any movement on yours. I agree that it doesn't look like it was designed to provide much up/down adjustment. Guess that's why in later years they went with the lower pod design.